2.1 AI-Assisted Software Development#
In this section, we will explore how to develop software with the help of an AI assistant. One of the things I like the most about AI-assisted software development is the fact that it allows me to stay in the flow. I can focus on the problem I am trying to solve and let the AI take care of syntax details, the boilerplate code, remembering conventions, and generating solutions to simpler intermediate problems.
Before jumping into it, let’s check the prerequisites.
Installation and Configuration#
We will use two Visual Studio Code extensions: GitHub Copilot and GitHub Copilot Chat.
GitHub Copilot is a code completion tool that uses AI to provide suggestions for code completion, inline documentation, and more.
GitHub Copilot Chat is an extension that allows you to interact with GitHub Copilot using a chat interface.
Getting access to GitHub Copilot#
To follow along with this section, you will need a GitHub account with access to the GitHub Copilot Individual or Business plan. If you activated your Student Developer Pack, you can access the GitHub Copilot Individual plan for free. Note that it usually takes a few days for the activation to be completed.
Installing the GitHub Copilot and GitHub Copilot Chat extensions#
You can install both extensions by searching for them in the Visual Studio Code Extensions Marketplace. To make sure that you install the correct extensions, you can install them from the terminal by following these steps:
Open the terminal.
Run the following commands:
code --install-extension github.copilot
code --install-extension github.copilot-chat
Once the extensions are installed, you will see a pop-up message asking you to sign in to use GitHub Copilot. Once you sign in, you will see that a Copilot icon appears in the bottom right corner of the screen. This means that you are able to use the extensions and you are ready to go.
Keep in mind
The results you get from the AI are not deterministic and depend on the context and the prompt you provide, the version of the AI and other factors. You will probably get different results than the ones shown here.
A real-world example#
Imagine you’re working on a Python project that helps you split expenses with your friends using a command-line interface (CLI).
Getting inline suggestions#
Let’s open VSC, create a new directory ch2 in the explorer and use the option “File” >> “Open Folder” to open this directory as the root of your project. Now, create a new file expense_splitter.py.
Querying Copilot with the inline chat#
As soon as we create the new Python file, we see a message that indicates that we can press Ctrl+I to open a GitHub Copilot Chat.

Go ahead and press Ctrl+I. You will see an inline chat window open. Insert, the following prompt in the chat window:
Write a Python module that divides expenses among friends for trips or outings. The app should:
- User input expenses, specifying the payer and the total amount in the format [(“Person1”:[34,2,3,45]),(“Person2”:[3,4,26]),...].
- I don’t want an interactive script, I want to pass the input as an argument.
- Automatically split shared expenses equally among all participants.
- Show a summary of how much each person should pay or receive.
You will see that the AI will start to provide suggestions for the implementation of the function. If you are satisfied with the suggestion, you can press Accept to accept it.
This is what I got:
from typing import Dict, List, Tuple
import ast
import sys

def split_expenses(expenses: Dict[str, List[float]]) -> Tuple[Dict[str, float], Dict[str, float]]:
    """
    Splits expenses equally among all participants.

    Args:
        expenses: Dict mapping person to list of their paid expenses.

    Returns:
        Tuple of:
            - Dict of net balances (positive: to receive, negative: to pay)
            - Dict of total paid per person
    """
    participants = list(expenses.keys())
    total_paid = {person: sum(amounts) for person, amounts in expenses.items()}
    total_expense = sum(total_paid.values())
    per_person_share = total_expense / len(participants)

    net_balances = {person: round(total_paid[person] - per_person_share, 2) for person in participants}
    return net_balances, total_paid

def print_summary(net_balances: Dict[str, float], total_paid: Dict[str, float]):
    print("Expense Summary:")
    for person in net_balances:
        status = "should receive" if net_balances[person] > 0 else "should pay"
        print(f"{person} paid {total_paid[person]:.2f}, {status} {abs(net_balances[person]):.2f}")

if __name__ == "__main__":

    if len(sys.argv) != 2:
        print("Usage: python expense_splitter.py '<expenses_dict>'")
        print("Example: python expense_splitter.py '{\"Alice\":[34,2,3,45],\"Bob\":[3,4,26],\"Carol\":[10,20]}'")
        sys.exit(1)

    # Parse the input argument as a dictionary
    try:
        expenses = ast.literal_eval(sys.argv[1])
        if not isinstance(expenses, dict):
            raise ValueError
    except Exception:
        print("Invalid input format. Please provide a dictionary like: '{\"Alice\":[34,2],\"Bob\":[3,4]}'")
        sys.exit(1)

    net_balances, total_paid = split_expenses(expenses)
    print_summary(net_balances, total_paid)
Explaining code#
To understand the code, we can use Copilot to explain it. We need to select the code, press Ctrl+I and the use the command /explain and press enter. Copilot will open the Chat window and will provide an explanation of the code.
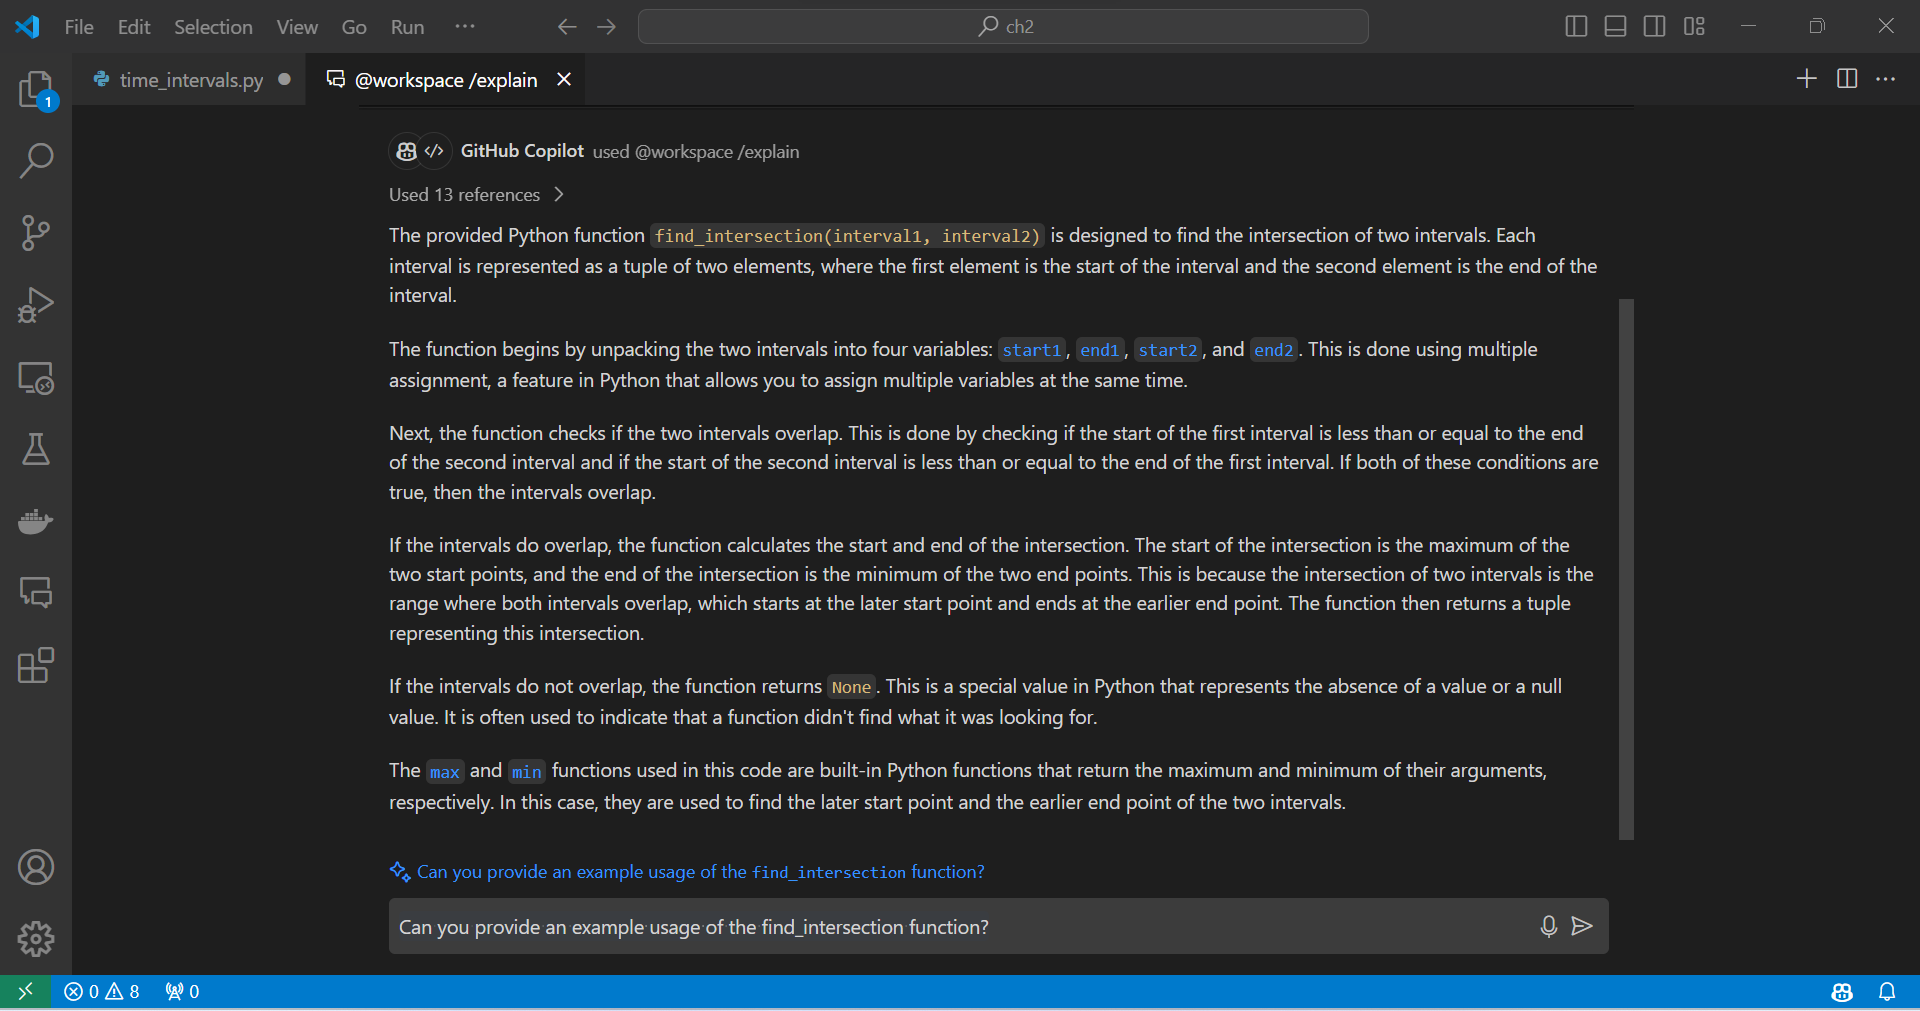
What to notice
In the chat window, we can see which references were considered for the explanation.
We can open the chat in the editor for a better view of the explanation.
Copilot suggests the next steps like testing or handling edge cases.
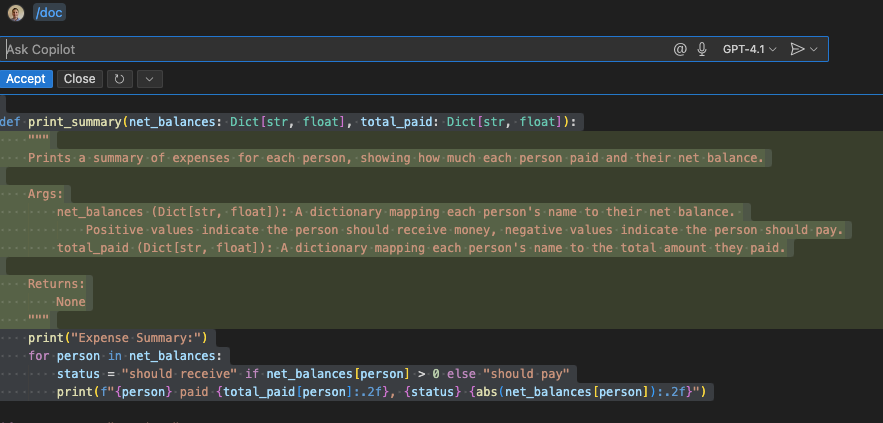
Generating documentation#
Now that we have a better understanding of how the script works, we can ask Copilot to add some documentation to the functions in it. We can select the function print_summary, press Ctrl+I and use the command /doc and press enter. Copilot will open the Chat window and will provide a docstring for the function.
Creating tests#
With our newly documented function, we can now use the /tests command to create tests for our function. This time, Copilot does not add code to the current file but instead suggests the creation of a new file, test_expense_splitter.py. This suggested file name follows a common naming convention for test files, which is to use the same name as the file to be tested, but with the prefix test_.
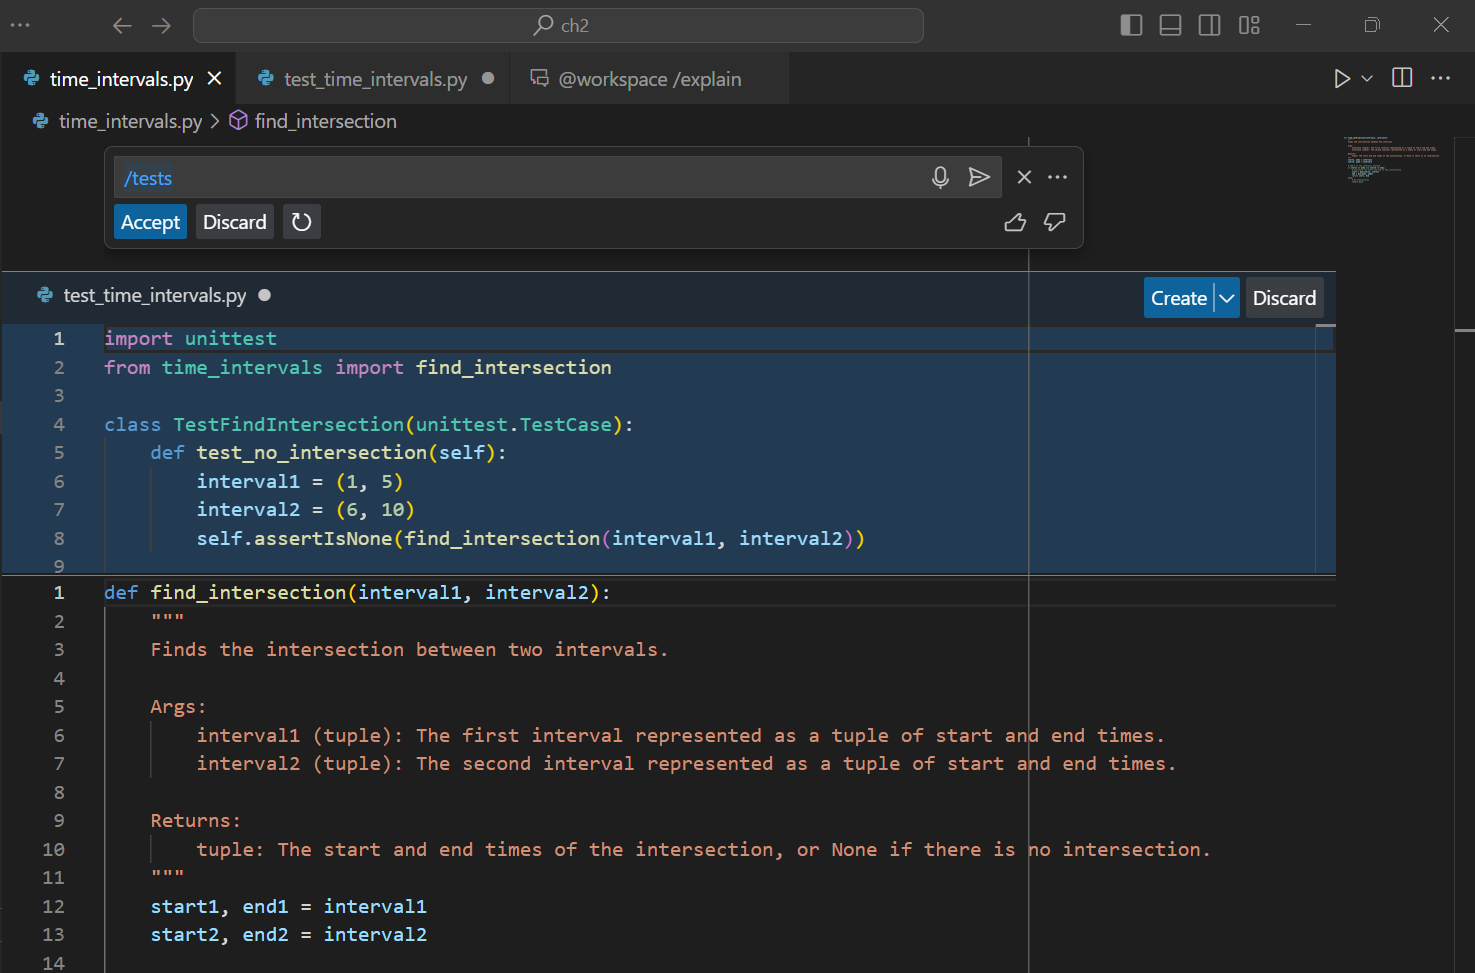
You can also combine the command with more detailed instructions. For example, you can use the command /tests with pytest.
Opening the Copilot Chat Interface#
Unlike the inline chat we used earlier (Ctrl+I), we’ll now use the standalone Copilot chat panel, which offers more features and better conversation management. You can access it in two ways:
Keyboard shortcut:
Ctrl+Shift+IUI: Click the Copilot icon in the upper right corner of the editor
Key Features of the Chat Interface#
The chat interface provides several advantages over inline chat:
Conversation History: All your previous interactions with Copilot are preserved, making it easy to reference earlier suggestions and maintain context across multiple coding sessions.
Enhanced Context Management: Use the “Add context” button to include specific files, selected code, or workspace information. This helps Copilot provide more targeted and relevant suggestions based on your current project.
Multiple Interaction Modes:
Ask: Get explanations, suggestions, and answers to questions
Edit: Request direct code modifications and improvements
Agent: Let Copilot take autonomous actions to complete tasks
Model Selection: Choose from different AI models (e.g., GPT-4o) depending on your needs and subscription level.
Generating sample code#
Beyond code completion and documentation, we can also use Copilot to generate sample code and boilerplate structures. To demonstrate this capability, we’ll create two sample DataFrames with a common column using the dedicated Copilot chat interface and the Agent mode.
Open the Copilot chat interface using Ctrl+Shift+I and select the Agent mode. In this mode, you can ask Copilot to perform tasks on your behalf, such as creating files or writing code.
In the chat interface, insert the following prompt:
Create a new file named syntax.py with two sample dataframes that contain a common column.
We will see that Copilot will create a new file named syntax.py and populate it with two sample DataFrames that contain a common column. It will also ask if we want to keep the suggested changes or if we want to undo them.
import pandas as pd

# Create the first dataframe
df1 = pd.DataFrame({
    'A': ['A0', 'A1', 'A2', 'A3'],
    'B': ['B0', 'B1', 'B2', 'B3'],
    'common': ['C0', 'C1', 'C2', 'C3']
})

# Create the second dataframe
df2 = pd.DataFrame({
    'C': ['C0', 'C1', 'C2', 'C3'],
    'D': ['D0', 'D1', 'D2', 'D3'],
    'common': ['C0', 'C1', 'C2', 'C3']
})
Finally, it will remind us to ensure that we have Pandas installed and share the command to install it.
Getting help with syntax#
Even seasoned developers sometimes forget the syntax for a specific operation. Copilot can help with that. For example, if you forget the syntax for a specific operation, you can ask Copilot for help.
If we now move to the end of the file and add the following comment:
# Merge the two DataFrames on the column 'common' and add a suffix to the columns of the second data frame.
If we set the cursor below the comment, we will see that Copilot will provide a suggestion for the syntax of the operation. This time we can accept the operation with Tab.
df = df1.merge(df2, on='common', suffixes=('_df1', '_df2'))
Some tips for effective prompting#
When using GitHub Copilot, it is important to keep in mind that the quality of the suggestions you receive depends on the quality of the prompts you provide. Here are some general tips that can help you get the best results from an AI assistant like GitHub Copilot:
Clearly define the problem or task you need help with.
Provide relevant context and background information.
Break down complex problems into smaller, manageable steps.
Use descriptive variable and function names.
Include sample inputs and expected outputs for clarity.
Consider suggesting alternative approaches or variations.
Provide feedback to help improve the AI’s understanding and suggestions.
Experiment and iterate with the AI to find the best solution.
Ask for expert opinion in some field. Start your prompts like “As an expert software developer …”
Integration in other parts of the development process#
GitHub Copilot can also support other parts of the software development process and is adding new features every day. To date, it has the following features available:
Code Review: Automatically suggest improvements, detect bugs, and summarize code changes in pull/merge requests.
Bug Fixing: Propose fixes for detected issues or vulnerabilities.
Onboarding: Help new team members understand codebases by generating summaries or answering questions about the code
Coding Agent: You can assign GitHub issues to Copilot, or ask Copilot to create a pull request.
Commit message suggestion: Copilot can suggest descriptive commit messages based on your code changes.
Also, there are other companies that offer tools similar to Copilot, but these tend to be more “agentic”—taking a more proactive role in the development process—such as Windsurf, Lovable, and Cursor.
GitHub Copilot Plans and Data Privacy Considerations#
At the time of writing, GitHub Copilot is offered in several tiers tailored to different audiences: Free, Pro, and Pro+ for individual developers, alongside Business and Enterprise for organizations. While the technical features and model access vary between these plans, one of the most significant distinctions lies in how user data, particularly prompts, suggestions, and engagement metrics, is handled.
The Business and Enterprise tiers emphasize robust privacy safeguards. These plans are designed with organizational compliance and governance needs in mind, reflecting global trends toward data minimization and regulatory alignment. Their policies typically involve:
Prompts (the code or text you send to Copilot) being discarded immediately after a suggestion is generated.
Suggestions (the AI-generated code returned to you) not being stored by GitHub.
Engagement data (how you interact with suggestions) being retained for a fixed and limited period, commonly up to two years, to support service quality and security monitoring, after which it is deleted.
This model reassures organizations that sensitive intellectual property and proprietary code will not be used for AI training or long-term storage, while still allowing GitHub to operate and monitor the service effectively.
In contrast, individual plans, including Free, Pro, and Pro+, permit broader use of engagement data and user interactions. The intent here is to continually improve Copilot’s capabilities, refine the quality of completions, experiment with new features, and contribute to product and academic research. While this approach can accelerate innovation and improve the developer experience, it also means that user prompts and interactions may be retained or analyzed for longer periods and, in some cases, used to train models if the user has explicitly opted in.
These differing approaches to data handling are not merely administrative details. They shape the privacy profile of each plan. Users selecting a Copilot plan are, in effect, also selecting a data governance model. For organizations, the priority may be strict compliance and minimal data persistence. For individuals, it may be the willingness to exchange certain privacy concessions for more rapid and personalized product improvements. Understanding these trade-offs is essential for making an informed choice about which Copilot tier aligns with one’s privacy expectations and operational needs.